At this point the goal is to get the hang of the user interface for doing LabView development. Once you are used to the ways that things work, you will be more adept at finding things on your own and learning from the more advanced and specific examples that are typically available throughout the web.
As you have seen previously, a screenshot of the menus can help you quickly find something that is buried quite a ways down. The programming menu on the block diagram is important when programming even the most basic of VIs. The following figure shows the built in "Increment" function which will add one to a value which is wired to its input.
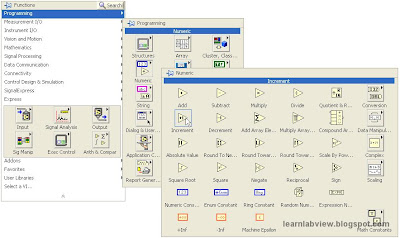
If you do the same sort of click and place operation that you did on the front panel menu to place controls and indicators, you will see that an icon just like the one in the menu appears on the block diagram. Furthermore, if nothing is selected on the block diagram, you will see the cursor automatically turn into something like a spool of wire if you hover it near the terminals or the increment icon that is placed. At that point, if you left click, a wire will be started. If you left click at another location where it makes sense, a wire will be completed. See if you can create the following piece of LabView code:
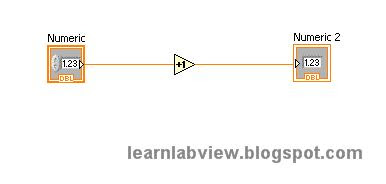
With LabView you should get used to the idea, just like reading an English textbook, that the program flows from left to right. The wire from the right side of the Control's terminal to the left side of the increment function actually passes the value typed in on the front panel to the increment. The output of the increment function will contain the value that is one more than the value received (which originated from the front panel control). Finally, that output will be displayed by the indicator terminal.
This is an extremely simple example, but it is not trivial to create for an absolute beginner. If you have made it this far, you are doing great. At this point you are beginning to get some basic familiarity with the LabView interface.
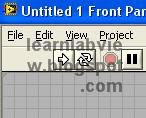
Above is the top left corner of the front panel window. The toolbar button which looks like an arrow pointing right is very important in LabView. This button starts the execution of the program. It will run only once until the block diagram is satisfied and all outputs are generated. This is a key concept in LabView programming so I will repeat it: The program will run only ONCE until the block diagram is Satisfied and all outputs are generated. It is probably not entirely clear what that means at this point, but essentially, once all indicators have received their final values, the LabView program will stop running.
If you click the arrow the program runs and looks like the following: Notice the arrow turns black, and the "Stop" button is red. Clicking stop while a LabView program is running will stop it immediately before it finishes. The hotkey for doing this from the keyboard is "Ctrl + .". (While we are talking about hotkeys, try "Ctrl + E". This makes it much easier to switch from the front panel to the block diagram and back!)
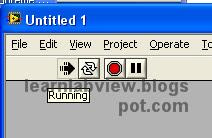
Of course, this example executes so fast that you will not really see the above image. Notice that the second icon in the toolbar looks like a cyclic pair of arrows. This icon will repeatedly execute the block diagram until you press stop. For simple VIs such as this one, you can make the indicators give continuous updates by running with this "Continuous Run" option. Try it. You will see that the VI appears to be running indefinitely. Now click on the Control on the front panel and type in some numbers and/or click the arrows to increment and decrement the value. Notice that the indicator is always displaying one more than the Control value. That is what the block diagram is telling it to do.
Below is a figure showing our example in action.

When you have a piece of code that you would like to save, it is much like any other Windows program. You use the File menu at the top and select save. A LabView program will be saved as a .vi file which contains all the information that defines your front panel and block diagram in a format that only LabView can read.
So, where do we go from here? At this point I will provide some tips that will help make independent learning a possibility. There are ways to quickly and easily learn what all the different built in functions do in LabView. An important tip involves a context sensitive help window that can tell you what things are and what they do.
First, navigate to the "Help" menu. Notice that pressing the hotkey Ctrl+H or clicking on "Show Context Help" will perform the same action:

When you click on this option, you will see a floating window that provides information when you hover over certain objects in LabView windows. If you navigate to the block diagram and hover over the increment function from our example you will see the following in the context help window:
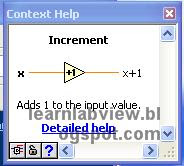
You can click on "Detailed help" to get a full fledged help window for more complex functions and VIs. You can close this window as you would any other by clicking the "X".
This window can be indispensable in looking at what all the functions do in the menus. You will find that if you simply navigate to anything in the programming menu on the block diagram then hover over the various functions, that LabView gives you a summary of what that function does in the context help window. If the function looks like something you can use in the block diagram, then click on it and place it.
You will notice that many functions have multiple inputs and/or outputs. Some are required and some are not. You just provide a wiring connection for each input and output for each function and the program will be able to run.
If your program is incapable of running due to errors, you will notice that the run arrow is broken:
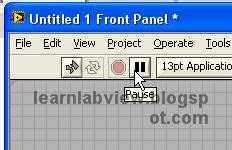
If you click it, you will get a dialog that shows you the error. You can click the errors and LabView will take you to the spot in the block diagram that is causing trouble. If you fix the error, the arrow will return to the original form so you can run the program.
One more tip for this lesson, which will not yet be explained in detail, is the location of the settings menu for LabView. There are many options available. Be careful which ones you change if you do not understand what it means. In an upcoming lesson, I will demonstrate the affects of some settings which can change the way LabView works and be helpful for some applications. For now, just be aware of where this menu is located.
Here is how you navigate to the menu:

Here is the dialog that appears. You can click on any of the categories to the left, and many options appear related to that option. If, in future lessons, the "LabView Options Menu" is mentioned, this is what I am referring to.
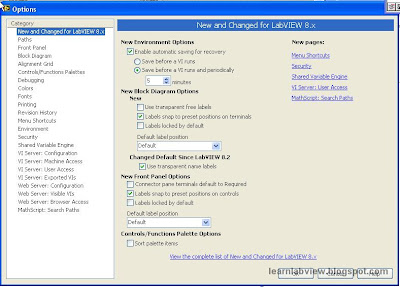
That is it for this lesson. You have a start to understanding LabView. The interface should not seem insurmountable at this point. There is plenty to learn about it, but hopefully you see the potential that LabView will have once you are accustomed to the majority of its features.


No comments:
Post a Comment